This wiki is a XML full dump clone of "Heroes Wiki", the main wiki about the Heroes saga that has been shut down permanently since June 1, 2020. The purpose of this wiki is to keep online an exhaustive and accurate database about the franchise.
Jason Badower/Blackout, Part 1: Difference between revisions
Jump to navigation
Jump to search
Content deleted Content added
imported>Ryangibsonstewart page 5 images |
imported>Ryangibsonstewart →Page 5: comments |
||
| Line 32: | Line 32: | ||
===Page 5=== |
===Page 5=== |
||
<gallery> |
<gallery> |
||
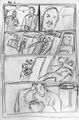
Image:Blackout, Part 1, P5 bnw.jpg|Jason found the third panel to be especially challenging. "It needed to be exciting enough that you'd want to come back and find out what happened in the [[Blackout, Part 2|second half]]. But I didn't want it to be insanely over the top either. The [[dying patient|kid's]] not Electro and [[Mohinder]] ain't pulling on the red and blue spandex." |
|||
Image:Blackout, Part 1, P5 bnw.jpg |
|||
Image:Blackout, Part 1, P5 tones.jpg|In the script, [[Mark Sable]] wrote the blackouts to be flat black. However, Jason tried to make sure a window was visible each time to provide a light source. |
|||
Image:Blackout, Part 1, P5 tones.jpg |
|||
Image:Blackout, Part 1, P5.jpg|"I wanted to go warm in this top panel for two reasons. One, I wanted to illustrate that it was a scene where these two characters are comfortable with one another. It's a nurturing atmosphere. Secondly, I also wanted it to contrast with the third panel as much as possible." |
|||
Image:Blackout, Part 1, P5.jpg |
|||
</gallery> |
</gallery> |
||
Revision as of 01:54, 11 September 2007
Jason Badower shares his original art and comments about his work on Blackout, Part 1.
Page 1
-
 Jason said he was not as pleased with Blackout, Part 1 as some of his other Heroes novels. "I think my biggest mistake was to not go back and double check my layouts. While I'm happy with the art, I think there are some areas where the storytelling suffered."
-
 "I hate sound effects. 'Shoonk' is one of my least favourite. There is no sound effect in the script. I thought it was pretty obvious that the lights go out--especially with the caption 'In the dark'."
-

-
 Despite other problems in the novel, Jason feels that page one is one of the best pages of the set. However, he notes that there was no large splash page in the issue.


Page 2
-
 Jason likens the disappointed feeling Heroes fans got from reading his comic as "going into a Kubrick movie and someone showing you a James Cameron film instead. It's not bad--it's just not what you wanted or expected."
-
 Jason expresses concern about two issues on this page: Mohinder's head in the first panel seems uncomfortable, and the nurse's face in the third panel isn't worried enough. "If she's not worried, then the reader isn't worried."
-
 "I like to think I have a very subtle comic book style. I like moody, realistic palettes. I like my people to look realistic. I like wide tiers to my panels as it resonates with what we see on the movie screen. I like consistent and dramatic lighting with powerful fill lights."


Page 3
-
 Jason outlines the problems with this page: "The first problem is that people aren't sure where [Mohinder's] being knocked into. Because of the heart attack patient established on the previous two pages, you instantly assume that he's being knocked into that room. That he gets knocked into another room is confusing...I should have had the heart attack patient visible in his room on panel 2 or 3 so we know that he's in another room."
-
 "It feels to me like Mohinder is wheeling his arms trying to get his balance for a good 2-3 seconds while the director and the Primatech guy cross the floor towards each other to embrace. In my head it's like some Wile E. Coyote sketch. One solution is to place the salesman closer to the director...But if I did that, [it] would destroy the flow of the story."
-
 Jason also felt it wasn't clear that the director was elbowing Mohinder, and wishes there was "a little, 'Oof!' from Mohinder on panel 3" and "maybe a small, 'Ah!' on panel 4." He also thinks that in his rush, he didn't use his best storytelling skills to properly convey the "It's not polite to stare" comment. "What I should have done was had Mohinder staring off panel to our right at the patient.


Page 4
-
 Jason feels that this page is him doing what what he does best. " Solid conversations with interesting people."
-
 Jason really enjoyed drawing this conversation between Mohinder and the teenage patient. He also refutes any silly theories that the teenage patient is actually a depiction of Kristen Bell.
-
 This is the digital painting that Jason does before adding colors. Visible are the brush strokes and other elements that "bring a painted, hyper-real quality to the work."
-
 Jason disagrees that his work is photorealistic. In fact, he works quite hard to make his art have a unique style and tone. "Simply making it look like a photo is bloody boring. If you want a photo, go check out the TV show."


Page 5
-
 Jason found the third panel to be especially challenging. "It needed to be exciting enough that you'd want to come back and find out what happened in the second half. But I didn't want it to be insanely over the top either. The kid's not Electro and Mohinder ain't pulling on the red and blue spandex."
-
 In the script, Mark Sable wrote the blackouts to be flat black. However, Jason tried to make sure a window was visible each time to provide a light source.
-
 "I wanted to go warm in this top panel for two reasons. One, I wanted to illustrate that it was a scene where these two characters are comfortable with one another. It's a nurturing atmosphere. Secondly, I also wanted it to contrast with the third panel as much as possible."


Notes about Jason's drawings are taken from his weblog.